
Online Surveys > Blog > Survey Summer School, week four: getting people to do your survey!

Survey Summer School, week four: getting people to do your survey!

The fourth in a five-week series to help you get the most out of your Online Surveys free trial or subscription.

You have a survey that’s well-built, routed and personalised. Now: getting people to fill it in. Distribution is where most response rate is won and lost. This week we’ll cover launching, scheduling, three ways of controlling who can respond, and a feature that change most change the success of your distribution.

Launching

To make your survey live, go to the Distribute area of your survey, choose the Launch tab, and click Launch survey. Do this only once you’ve finished editing in the Build area.

Launching will:

  • make the survey state ‘open’ and the URL active
  • enable you to issue invitation emails from a respondent list

Launching will not:

  • change your survey’s open date, if you’ve set that in the future, the status becomes ‘scheduled’
  • automatically send invitations to anybody

You can also customise the survey URL and generate a QR code from this tab.
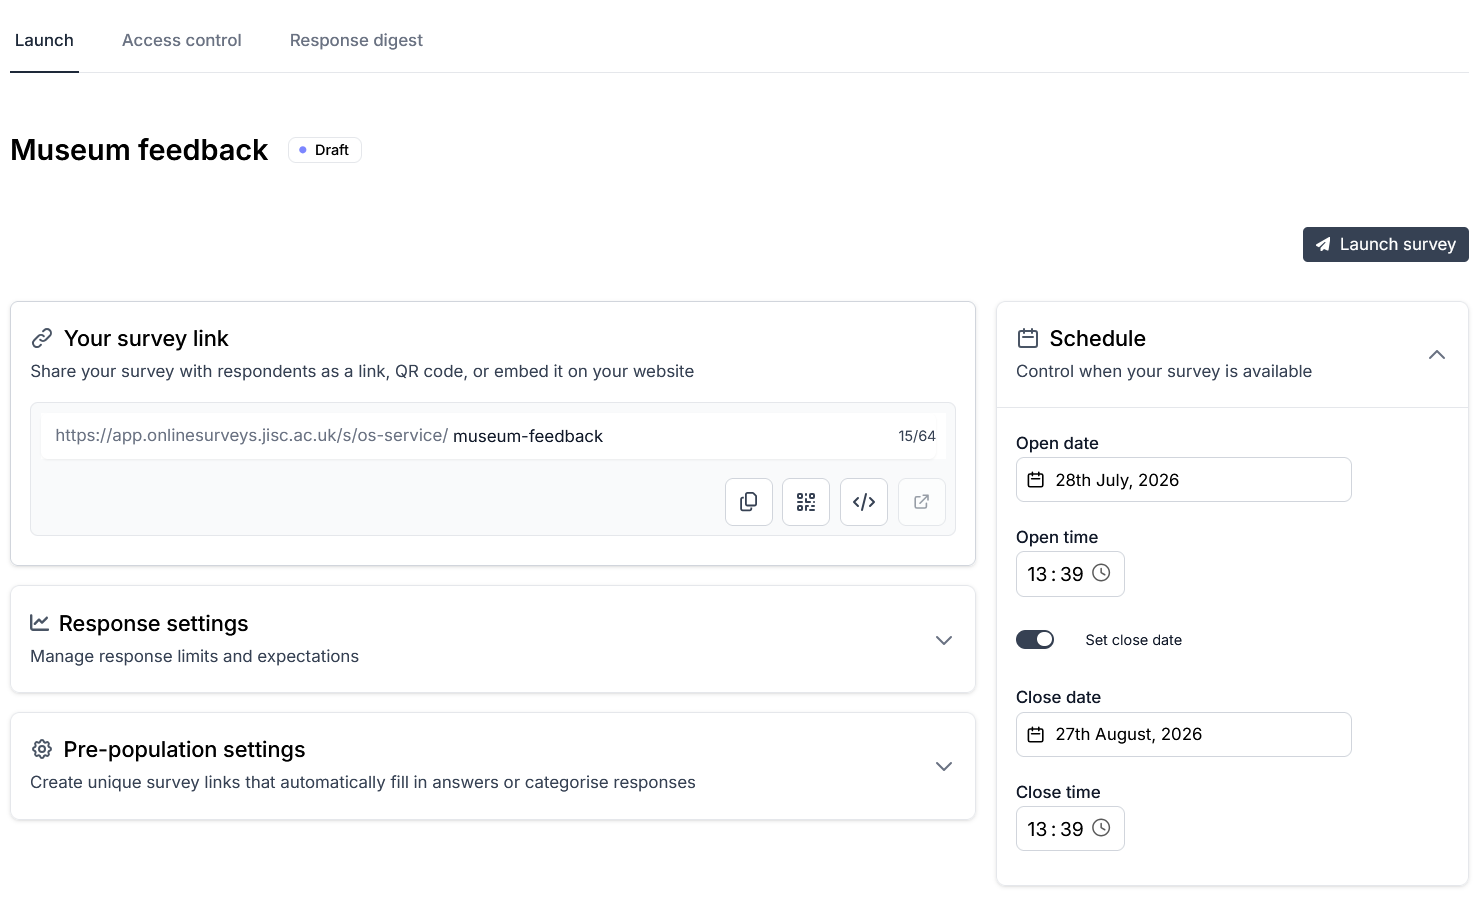
Distribute dialogue box with options for scheduling and URL editing
Distribute page with options for scheduling and URL editing

The schedule panel

The schedule panel sets when your survey opens and closes.

Open date determines the earliest a respondent can access the survey. It defaults to when the survey was created. Setting it in the future after launching puts the survey into ‘scheduled’ status.

Close date determines the latest a respondent can submit. By default, your close date is set to 30 days from when the survey was created. Check this date and change it if you need to. Two to three weeks is usually right for internal audiences but you may need longer for public consultations, where you may have statutory minimums to meet.

If you want the survey open indefinitely, switch the ‘Set close date’ toggle off and it will stay open until you manually close the survey or it hits its response limit.

Response settings

In the response settings panel you can see:

Response limit: your survey closes when it’s reached. The maximum response limit is set at the account level, which is 20,000 for a paid account but 30 for a trial. You may want to set a lower response limit if you’re running a sample of fixed size or you’re capping a prize draw.

Expected responses: how many responses you hope for, and it’s what the platform uses to calculate your response rate in the Analyse area. If you’ve uploaded a respondent list, the size of that list appears here instead.

Who can respond? The three access control options

In the Access control tab you’ll find three options

1. Public URL

Your survey gets a link which you can distribute yourself, and anyone with the link can respond.

This is right for open audiences: public consultations, visitor feedback, or anything where you don’t have a list of who your respondents are.

Remember you can customise the survey URL on the launch tab.

You can also generate a QR code. Museums and galleries can put codes on exit signage and interpretation panels. Libraries can put them on desks. Colleges can put them on tables in cafes and shared learning spaces. Councils can put them on notices.

2. Password

Anyone reaching the survey through the public URL sees a login page and needs a password to get in.

Use this where the audience is closed and you have a method of sharing a password with your respondents.

3. Email list

This is a powerful distribution feature, not available on the free trial. But it’s worth understanding, as for many organisations it’s the reason to subscribe and opens up pre-population.
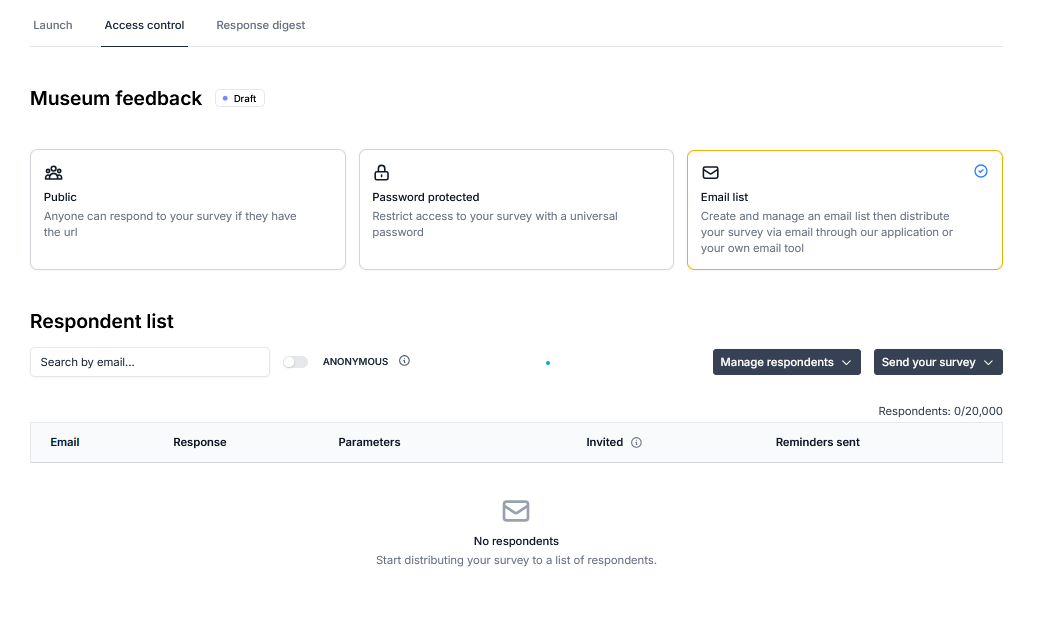
Access control options tab

Email lists: what you actually get

You upload a list of respondents, and each person gets their own unique URL. That  unlocks several useful things:

  • You can email invitations directly from the platform. You won’t need to do a mail merge or copy-and-paste into external email clients
  • Each person can only respond once. You can prevent ballot-stuffing or accidental duplicates from someone who wasn’t sure whether they’d already done the survey
  • You can see who has and hasn’t responded, which means you can chase easily
  • You can send reminders to the people who haven’t responded, rather than emailing everybody again. For most surveys, the reminder brings in a substantial share of responses
  • You can pre-populate answers with what you already know about each person. Their department, location, cohort or service already filled in, and this data will be available to pipe into later questions
  • You can download the whole list with the unique URLs as a CSV and send the invitations from your own email client if your prefer.

The list capacity depends on your subscription: 500 respondents per survey on Single user, and 20,000 on Project and Organisation plans.

Setting up respondent lists and reminders

In Distribute, under Access Control, set your access mechanism to Email List.

To set up your respondent list, you simply need to create a csv file. The first column should have the header ‘Email’ and then a list of emails goes below. Upload that to the respondent list page – under Manage respondents click Add/edit multiple. Alternatively, if you have a short list of respondents you can add emails one by one using Add single.

Once uploaded, you can send invitations to your potential respondents to complete the survey. After you have launched your survey, click Send your survey and then click Invite respondents. This issues invitations to everyone on your uploaded list, with a unique access URL for each participating embedded in the email. You can send reminder emails to your list of emails up to seven times.

One way of boosting your response rate is to get your invitation email right. You can edit the default message sent out to respondents by clicking Send your survey and Customise invitations. Include a bit of context about your survey, change the sender of the survey (eg New Town Museum or Poppleton University Alumni Team), and change the subject (eg “Let us know your thoughts about your recent visit!”).

Make sure you track your respondent list. You will see who has been invited under the Invited column (a green tick for those that have received the email invitation). You can see who has responded, and a link to their response under the Response column.

Pre-population

Pre-population allows you to pre-fill data known about your respondents.

This can help to make your survey shorter, ensure your data is more accurate, and if combined with the piping we demonstrated last week gives you an effective way of customizing your survey.

There are two main methods of using pre-population, one allows you to prefill one or two key questions while maintaining a public URL, while the other allows you to prefill as many questions as needed using a detailed respondent list upload.

A museum or charity marketing professional could generate custom URLs to capture which social media channel a survey respondent came from. A council could set up links for each of the libraries under it’s remit, while retaining data within a single survey.

A college could prefill a student’s cohort, age, gender, course, student ID, and mode of study through an upload of data, and make an end of year evaluation survey significantly shorter.

We won’t cover the details of this in this weeks blog, but detailed information on the pre-population is available on our help pages.

Beyond the trial

Your trial covers three surveys at 30 responses each, distributed by public URL – which is exactly right for piloting.

Email lists, unique links, reminders and pre-population come with a subscription, and they’re the features that turn a survey into a managed exercise: you know who you asked, who responded, and who to chase.

Your 15-minute task

  • Check your close date. It defaults to 30 days from survey creation
  • Set your expected responses, so you can check your response rate next week
  • Customise your survey URL, and generate the QR code
  • Launch, then open the live link yourself on a phone and complete it
  • Send it to three colleagues to pilot

Next week

We finish the summer school by looking at how to turn a bunch of responses into something you can act on. We’ll look at charts, filters, exports, and the analysis feature that tells you exactly where your survey lost people.

Full guidance on launching, access control and respondent lists is in the Online Surveys help pages.